Coaching tips
Physical conditioning exercises on the field
You don’t need large amounts of specialist equipment to improve your physical conditioning. This section lists some exercises that can be completed on the field with limited equipment. This type of session is the starting point for most players who have limited strength training experience and poor functional competence.
The session could be described as an example of anatomical adaptation as it gradually strengthens the body and teaches proper technique. This will eventually enable you to move on to more advanced strength training in a safe manner and with appropriate progression. If you were to undertake an advanced strength and conditioning programme without first completing a functional assessment and performing the appropriate corrective exercises through anatomical adaptation, it could have a negative impact on your performance and increase the chances of injury. It is important that exercises such as those shown below are supervised by an accredited strength and conditioning coach.
The session outlined here is just an example of what can be undertaken on the field for an adult team. The repetitions and times must be determined by the current levels of technique and experience. It is best to complete this session in a circuit format, going from exercise 1, to 2, to 3, to 4, etc., and having a break once a circuit is complete; then, continuing with more circuits depending on the experience and technique of the player.
1. Push up
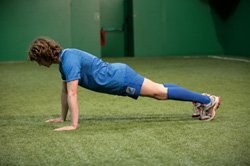
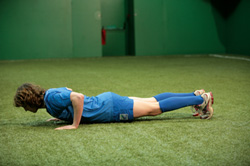
From a fully locked-out position, with arms straightened, lower the body so that the chest touches the ground. Using the chest, shoulders and triceps, return to the starting point.
Keeping a straight, flat back, maintain a controlled descent / ascent throughout the exercise. Keep the shoulders and hips in line to prevent lifting or dropping of the buttocks.
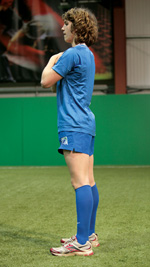
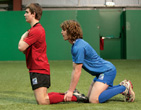
2. Aeroplane
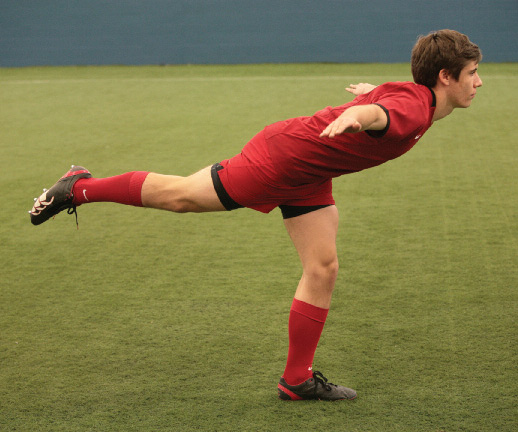
 Support body weight on one leg with a slight bend in it. Lean forward with a straight back and straighten the arms out to the sides. The rear leg points straight behind at a slight angle to the back.
3. YTWL
This is a prone shoulder circuit that is used to strengthen and stabilise the muscles of the upper back and shoulder. The letters Y, T, W and L describe the shape made by the prone positions.
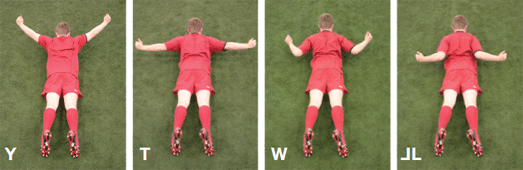 Y place the arms above the head at 45 to 90 degrees above shoulder level. Point the thumbs up to activate the rotational muscles of the shoulder blade area.
T place the arms fully straightened at a 90 degree angle from the torso. Turn the thumbs up. Keep the shoulder blades down and pulled back throughout, whilst trying to maintain a 90 degree angle.
W place the upper arm at a 45 degree angle to the torso, with the lower arm at a 90 degree position to form a W shape. Maintain alignment between wrist, elbow and shoulder.
L place the upper arms as close to the side of the body as possible, with the lower arm as near as possible to a 90 degree angle. Keep the elbows pressed into the torso. Try to maintain alignment of elbows, wrist and shoulders.
4. Bodyweight squat
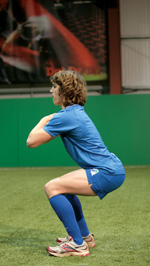 This exercise develops strength, stability and flexibility in the lower body, while also improving core stability. Place the feet slightly wider than shoulder-width apart, with the toes turning outwards so that the middle toe is in line with the knee. Before descent into the squat, take a deep breath to fully inflate the lungs so that the upper and lower back remains braced. Descend under control, squatting as low as possible with a straight back. Ensure that the chin is off the chest and the eyes are looking straight ahead to maintain a strong, flat back. Focus on sitting back by pushing the hips and buttocks behind the body and placing bodyweight through the heels. In the ascent phase, focus on keeping the chest and head held high and the hips up and forward. Push the heels into the floor and exhale as you return to an upright stance.
5. Bridge
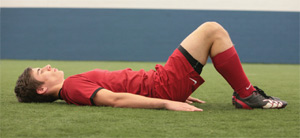
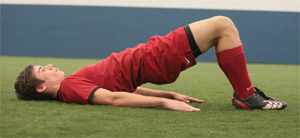 This exercise improves core stability and strengthens the muscles of the hamstring and buttocks. Lie on your back and raise the hips to create a straight line from the knee to the shoulder. Ensure the heels are flat on the floor and that the flat of the hand is pressed firmly into the ground. Focus on pulling the navel in towards the spine and activate the buttock muscles throughout.
6. Lunge
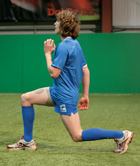
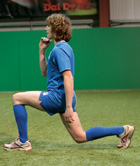
Step forward and bend the back knee. Keep the back straight and perpendicular to the ground. Don’t let the front knee go past the toes. Return to starting position and repeat the same movement starting with the opposite leg.
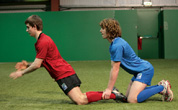
7. Partner pull
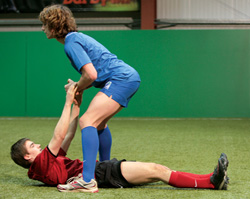
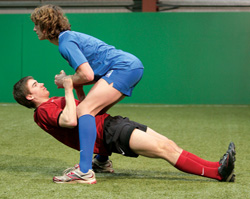
This exercise involves two people. The first person lies on the ground and the second person straddles the first. The person in the straddle position squats down with a straight back and bends the arms at the elbow. The person on the ground grips the partner’s arms like a chin-up bar and, keeping a straight body, pulls up off the ground, pivoting at the heel.
8. Oblique / side bridge

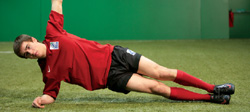
This exercise strengthens the muscles at the side of the torso and the lower back. Position the body on the side so that it is supported by the elbows and feet. Lower the hips under control so that they touch the ground lightly and then return to the starting position by raising the hips. Ensure that the body is kept in a straight line and that there is no inward or outward rotation. Keep the shoulders, hips, knee and ankles in line.
9. Single leg stance
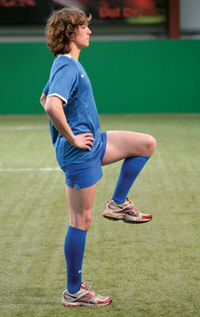
Stand on one leg with hands on hips. The non-stance knee must be bent to 90 degrees and raised into the high knee running position with the toes curled up towards yourself. Try to stay balanced for the same time on both legs.
10. Hamstring drop

This is best performed with partner assistance. One player adopts a kneeling position with the second player positioned directly behind. Kneel on a soft surface with the partner securing and anchoring the participant’s ankles. The player then descends slowly with good posture and makes contact with the ground by absorbing the drop with open palms. Keep the shoulder blades pulled down and back to maintain a flat back. Avoid dropping the head by keeping the chin off the chest. The player should push themselves back up so as not to use hamstrings concentrically.
Disclaimer
Anyone intending to undertake a physical conditioning programme should seek medical advice from a registered medical practitioner prior to doing so. The information and guidelines regarding the skills of Rugby and associated physical conditioning should only be used following and in conjunction with advice from appropriately qualified trainers, coaches and referees.
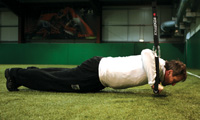
Functional strength training for Rugby
A progression from bodyweight drills to the inclusion of functional training equipment
Rugby is a contact sport so players need to be strong enough to maintain balance and stability in contact. Players need to be able to apply strength both when making a tackle and also when resisting a challenge (i.e., being tackled). The other key benefit provided by a functional strength and conditioning programme is that you will be less prone to injury. The muscles and joints become stronger, which is especially important for the neck, shoulders, hips, knees and the core of the body.
Weight training is an excellent form of strength training which provides a comprehensive range of benefits to the Rugby player. However, not all players will have access to weight training facilities at the training ground or at a local gym or sports centre.
Weight training must be supervised by a fully qualified strength and conditioning coach or experienced fitness instructor for two important reasons: first, health and safety, and second, sessions need to be Rugby relevant and specific. This could also present a problem for some Rugby clubs if such an individual is not available.
The illustrated body weight circuit shown above is an excellent starting point, but it is important that there is a progressive challenge available. This can be provided by the use of functional training apparatus. The benefits produced are not just limited to gains in strength but also in flexibility, stability and balance.
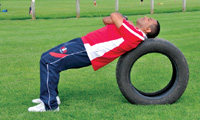
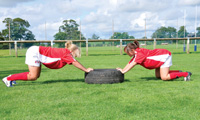
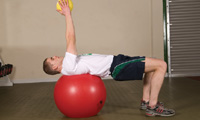
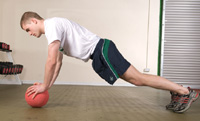
A practical and convenient alternative to weight training is provided by the use of tyres, medicine balls, stability balls and suspended bodyweight training apparatus. All of these training tools will facilitate functional strength development as opposed to developing general strength for no real purpose. As with weight training, they produce a compound and whole body conditioning effect. But it is likely that they will provide a cheaper and more versatile option that can be used indoors or outside on the training pitch. The other advantage offered by these tools is that they can be conveniently stored and used at the Rugby club itself. They are also very adaptable and can be used to develop positional specific qualities such as sprinting, tackling or scrummaging.